What is Composting?
Composting can be defined as the biological decomposition and stabilization of organic substrates, under conditions which allow development of thermophilic temperatures as a result of biologically produced heat, leading to a final product which is stable for storage and provides nutrition to land without causing any adverse environmental effects. Simply putting, it is the natural breakdown of organic matter under suitable temperature and moisture conditions, so as to produce a nutrient rich mixture, which will help in improving the soil properties.
The compost can be produced at home easily, but one must know the right method to begin with, and get the best results.

The Basic Requirement
To begin with, a suitable container or store area is required. As the natural process of composting generates heat, storing compost in a container enables the heat to be retained more easily, which allows for the efficient and quick breakdown of material. It is best to keep a compost heap covered to retain this heat. When moisture is needed, it is usually supplied in the form of moist grass cuttings and other green waste. Also, care should be taken that the compost chamber is not too wet, which can hamper the rate of the natural process.
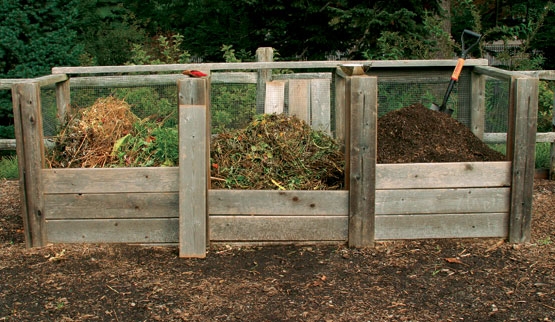
Selection of the right container for the purpose of composting requires taking into consideration various factors, such as location, climatic conditions, type of soil, etc. Following are the few options to decide from:
- Plastic bins : These are fitted with a hatch at the bottom for easy access of composted material. These can last longer, but the non – porous structure restricts entry of moisture and air circulation.
- A slatted wooden bin encourages greater air circulation, improving the ventilation of the heap. A wooden sectioned container can be dis-assembled in layers, allowing certain regions to have circulation. But wooden containers have a short life, and mites can affect them easily.
- A concrete bin may have a block or slatted structure. Unlike its wooden alternatives, it will not rot.
- Large recycled containers can also serve as compost blocks.
The process of composting usually takes requires between two to nine months to be completed. The crumbly, fully decomposed compost is formed at the bottom – most layer of the container, so one must have access to the base of the heap, to get the best compost for use on the garden. Some containers have an access hatch at the bottom of the container such as the wooden sectioned containers, while others may need one side to be disassembled so that the bottom level of compost can be dug out.
Materials for Composting
One can be under the disillusion that all organic materials are suitable for composting. Although it is true, but many materials can attract vermins, and have other adverse effects, hence such materials must be avoided. The materials for composting can be widely divided into brown materials and green materials.
Brown waste
This category includes the slowly – rotting items that have a high carbon content.
- Dead or fallen leaves
- Shredded paper
- Coffee grounds and filter
- Cardboard torn into small pieces
- Woody hedge clippings and twigs
- Sawdust
- Hay and straw
Green waste
This category includes all types of green leafy garden waste. Also, quick – rotting waste material is also included in this group. All these items have a high nitrogen content.
- Fresh grass clippings
- Flowers
- Vegetable and fruit peelings, easily available from the kitchen.
- Vegetable crop residue, such as potato and tomato plants.
- Manure, such as from horses, cows and rabbits.
- Tea leaves
The Procedure
To obtain a good compost, the organic material must be properly arranged in the compost bin, and it must ensured that the right amount of temperature and moisture is provided to the organic material in the container. A general guide for the procedure is given below.
- Spread a layer of several inches thick, about 4 to 5 inches, of the brown materials on the surface soil placed in the compost bin. This is the first layer.
- The green materials are added in the next layer, about 6 inches thick.
- A thin layer of garden soil is added on top of the green materials.Sprinkle enough water to make the layers moist but not soggy.
- Repeat the steps 1 – 3, until your pile reaches the height of 3 feet nearly.
- Turn and churn the pile after 2 weeks to heat it up. A garden fork or shovel or a long rod can be used for this purpose. If your compost has a strong odor, turn it more often as your is pile is tightly packed and is poorly aerated.
- Ensure that the pile is heating up. When you first turned the pile, you may see steam rising from it. This signals decomposition.
- Add nothing to the pile once the composting process has begun.
- The process is completed when the pile is no longer heating up and the original materials turn earthy and black.
The compost is now ready, and can be used on the soil in your garden. Also, the compost bin can be used for another compost after cleaning.

Benefits of Composting
- Adds soil nutrients necessary for plant growth.
- Improves plant growth.
- Helps rehabilitate infertile soils.
- Improves the soil condition and texture. It breaks up clay soil, helps sandy soil retains moisture, and relieves compaction.
- Controls plant disease pathogens.
- Improves soil drainage.
- Reduces soil erosion.
- Makes the soil easy to cultivate.
Leave a Reply